A Container encapsulates selected objects for advanced editing.
Containers:
To create a Container:
1. Select Container Mode
2. Drag out a rectangle encapsulating the objects to be included in a Container. Any objects pre-existing on the page which are within the container will be included in it, and any object subsequently created or moved into the rectangle will also be included. An object is considered to be included if its top left corner falls inside the container rectangle.
3. Once a Container is established, moving the container using its left or top border will also move all the included objects.
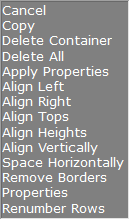
4. Right click on the background of the container to pop up a Container Editing Menu.
- Reduce repetitive tasks. (Such as deleting or copying objects, etc).
- Aligns objects accurately.
- Are not visible when printed or displayed as a web page.
- Allows groups of objects to be moved collectively.
* Menu tools can be used consecutively - Align Left, Align Right, Align Heights, etc).
- Aligns objects accurately.
- Are not visible when printed or displayed as a web page.
- Allows groups of objects to be moved collectively.
* Menu tools can be used consecutively - Align Left, Align Right, Align Heights, etc).
Below are the objects used in this example .
2. Drag out a rectangle around the objects to be considerd contents of the Container.
4. Right Mouse click to see the Container editing menu.
This
This
is
is
a
a
test.
test.
Once a conatiner is established:
1. It may be dragged with the top and left side border.
2. The Container dimensions may be altered with the right side and bottom border.
3. All objects within the Container are subject to the Container Editing Menu.
1. It may be dragged with the top and left side border.
2. The Container dimensions may be altered with the right side and bottom border.
3. All objects within the Container are subject to the Container Editing Menu.
Container Menu
1. Cancel - Close the Container editing menu; alternatively click anywhere on the page to Cancel.
Containers

This
is
a

test.
Verity Document
Lennox Computer - 07 3267 7880
info@lennox.com.au
Brisbane, QLD, Australia.
info@lennox.com.au
Brisbane, QLD, Australia.

